O Meu Primeiro Projecto Arduino®
30-06-2022
Um pequeno projecto de 10 minutos para poder controlar LEDs.
Material Necessário:
Software:
- Software Arduino IDE (https://www.arduino.cc/en/software).
Hardware + Componentes Electrónicos:
- 1x Arduino UNO (ou clone 100% compatível);
- 5x LED genérico (vermelho, verde, azul, amarelo, branco), de 3 mm ou 5 mm;
- 5x resistência de 220 ohms 1/4 de watt;
- 1x breadboard;
- Vários fios eléctricos para ligar os componentes.
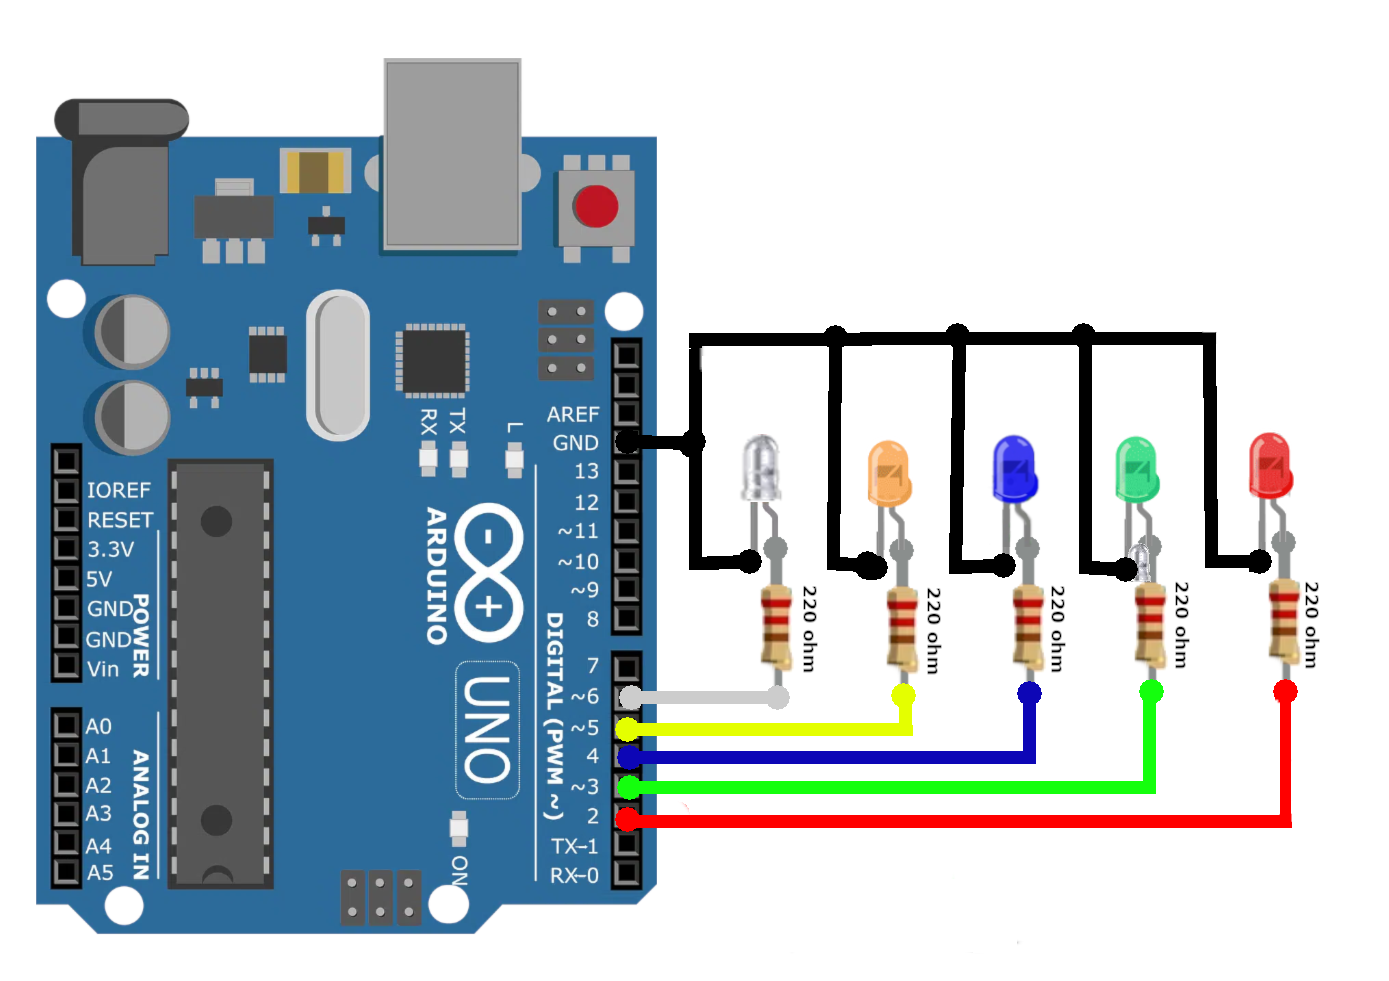
Esquema/Diagrama de Ligação:

Código/Sketch:
----------------------- Blink.ino -----------------------
///////////////////////////////////////////////////////////////////////////////
// Project: Blink LEDs
// URL:
// File:    Blink.ino
//
// Description:
//          This Sketch controls a series of LEDs connected to an Arduino.
//          Turns an LED on for one second, then off for one second, go to
//          the next one, repeatedly.
//
// Copyright (C) 2019-2022:
//          José Caetano Silva / CaetanoSoft
//
// License:
//          This file is part of Blink LEDs.
//
//          Blink LEDs is free software: you can redistribute it and/or modify
//          it under the terms of the GNU General Public License as published by
//          the Free Software Foundation, either version 3 of the License, or
//          (at your option) any later version.
//
//          Blink LEDs is distributed in the hope that it will be useful,
//          but WITHOUT ANY WARRANTY; without even the implied warranty of
//          MERCHANTABILITY or FITNESS FOR A PARTICULAR PURPOSE.  See the
//          GNU General Public License for more details.
//
//          You should have received a copy of the GNU General Public License
//          along with Blink LEDs.  If not, see <https://www.gnu.org/licenses/>.
///////////////////////////////////////////////////////////////////////////////


// The Red LED anode (+) pin on Arduino
#define LED_RED_PIN    2
// The Green LED anode (+) pin on Arduino
#define LED_GREEN_PIN  3
// The Blue LED anode (+) pin on Arduino
#define LED_BLUE_PIN   4
// The Yellow LED anode (+) pin on Arduino
#define LED_YELLOW_PIN 5
// The White LED anode (+) pin on Arduino
#define LED_WHITE_PIN  6

// De number of total LEDs to use
#define MAX_LEDS 6
// The Vector list of the total used LEDs pins connected to the Arduino
const int ledsPins[MAX_LEDS] = {
              // Most Arduinos have an on-board LED you can control.
              // LED_BUILTIN is set to the correct LED pin independent of which board is used.
              LED_BUILTIN,
              LED_RED_PIN,
              LED_GREEN_PIN,
              LED_BLUE_PIN,
              LED_YELLOW_PIN,
              LED_WHITE_PIN
            };

/**
 *  The setup function runs once when you press reset or power the board.
 */
void setup()
{
  // Initialize the LEDs digital pins as an output
  for(int i=0; i < MAX_LEDS; i++)
  {
    pinMode(ledsPins[i], OUTPUT);
  }
}

/**
 *  The loop function runs over and over again forever.
 */
void loop()
{
  // Blink the LEDs
  for(int i=0; i < MAX_LEDS; i++)
  {
    digitalWrite(ledsPins[i], HIGH);   // Turn the LED on (HIGH is the voltage level)
    delay(1000);                       // Wait for a second
    digitalWrite(ledsPins[i], LOW);    // Turn the LED off by making the voltage LOW
    delay(1000);                       // Wait for a second
  }
}
----------------------- Blink.ino -----------------------
Instruções de Montagem:
| Arduino Uno | LED | Color |
|---|---|---|
| GND | Cathod (-) | Red |
| Pin 2 (Digital) | Anode (+) | |
| GND | Cathod (-) | Green |
| Pin 3 (Digital) | Anode (+) | |
| GND | Cathod (-) | Blue |
| Pin 4 (Digital) | Anode (+) | |
| GND | Cathod (-) | Yellow |
| Pin 13 (Digital) | Anode (+) | |
| GND | Cathod (-) | White |
| Pin 13 (Digital) | Anode (+) |
Faça as conexões entre os componentes como é mostrado na tabela 1 acima e no diagrama de ligação.
Use o Arduino IDE para colar o sketch "Blink.ino" e gravar-lo, depois compile-o e envie-o para o dispositivo Arduino Uno.
Funcionamento:
Ao alimentar o seu Arduino com tensão, os LEDs começaram a piscar sequencialmente com a frequência de 1 segundo.